Controlr
Smart House Hybrid Application Template
- created: 11/06/2014
- latest update: 11/06/2014
- by: Serge Shepelevich
- email: info@sergshepelevich.com
Thank you for purchasing my theme. If you have any questions that are beyond the scope of this help file, please feel free to email via my user page contact form here. Thanks so much!
Introduction
Overview
Controlr is a HTML5 native app development template that helps you build native-feeling mobile apps all with web technologies like HTML, CSS, and Javascript. Controlr requires AngularJS in order to work at its full potential.
Those familiar with web development will find the structure of a Controlr app straightforward. At its core, it's just a web page running in an native app shell! That means we can use any kind of HTML, CSS, and Javascript we want. The only difference is, instead of creating a website that others will link to, we are building a self-contained application experience.
The bulk of a Controlr app will be written in HTML, Javascript, and CSS. Eager developers might also dig down into the native layer with custom Cordova plugins or native code, but it's not necessary to get a great app.
Controlr also uses AngularJS for a lot of the core functionality of the framework. While you can still use Controlr with just the CSS portion, we recommend investing in Angular as it's one of the best ways to build browser-based applications today.
What's Included
Controlr comes with compiled Javascript and CSS for your app, JS Framework extensions, along with a great icon pack.
Cordova/PhoneGap/Trigger.io
To add Controlr to your Cordova, PhoneGap, or Trigger.io project, just reference the Ionic CSS and JS files from the web root of your app.
Browser Support
Controlr is focused on building native/hybrid mobile apps rather than mobile websites.
As such, our browser support tends to be whatever Web View API is available to native apps on a given platform. For Ionic 1.0.0-beta.13 "lanthanum-leopard", that means UIWebView for iOS 6+, and Android 4+ (with some support for 2.3).
Installation
Platform notes
First, we need to start with a note about minimum requirements for building your app with the current release of Contrlr. Controlr targets iPhone and Android devices (currently). We support iOS 6+, and Android 4.0+ (though 2.3 should work). However, since there are a lot of different Android devices, it's possible certain ones might not work.
You can develop Controlr on any operating system you prefer. In fact, Controlr has been developed at various times on Mac OS X, Linux, and Windows. However, right now you'll need to use the command line in order to follow this guide and you must have OS X in order to develop and deploy iPhone apps, so OS X is recommended if possible.
If you are on Windows, make sure to download and install Git for Windows and optionally Console2. You will be executing any commands in this guide in the Git Bash or Console2 windows.
First, we will go and install the most recent version of Apache Cordova, which will take our app and bundle it into a native wrapper to turn it into a traditional native app.
To install Cordova, make sure you have Node.js installed, then run
$ sudo npm install -g cordova
Drop sudo from the above command if running on Windows. Depending on the platforms you wish to develop for, you'll need to install platform-specific tools. Follow the Cordova platform guides for Android and iOS to make sure you have everything needed for development on those platforms. Luckily, you'll only need to do this once.
Linux Android note:
If you are running a 64-bit version of Ubuntu, you'll need to install the 32-bit libraries since Android is only 32-bit at the moment. $ sudo apt-get install ia32-libs If you are on Ubuntu 13.04 or greater, `ia32-libs` has been removed. You can use the following packages instead: $ sudo apt-get install lib32z1 lib32ncurses5 lib32bz2-1.0
Windows note on Java, Ant and Android:
NOTE: Whenever you make changes to the PATH, or any other environment variable, you'll need to restart or open a new tab in your shell program for the PATH change to take effect.
Java JDK
Install the most recent Java JDK (NOT just the JRE).
Next, create an environment variable for JAVA_HOME pointing to the root folder where the Java JDK was installed. So, if you installed the JDK into C:\Program Files\Java\jdk7, set JAVA_HOME to be this path. After that, add the JDK's bin directory to the PATH variable as well. Following the previous assumption, this should be either %JAVA_HOME%\bin or the full path C:\Program Files\Java\jdk7\bin
Apache Ant
To install Ant, download a zip from here, extract it, move the first folder in the zip to a safe place, and update your PATH to include the binfolder in that folder. For example, if you moved the Ant folder to c:/, you'd want to add this to your PATH: C:\apache-ant-1.9.2\bin.
Android SDK
Installing the Android SDK is also necessary. The Android SDK provides you the API libraries and developer tools necessary to build, test, and debug apps for Android.
Cordova requires the ANDROID_HOME environment variable to be set. This should point to the [ANDROID_SDK_DIR]\android-sdk directory (for example c:\android\android-sdk).
Next, update your PATH to include the tools/ and platform-tools/ folder in that folder. So, using ANDROID_HOME, you would add both %ANDROID_HOME%\tools and %ANDROID_HOME%\platform-tools.
Install
Control based on Ionic front-end framework and comes with a convenient command line utility to start, build, and package Ionic apps.
To install it, simply run:
$ sudo npm install -g ionic
Create the project
Now, we need to create a new Cordova project somewhere on the computer for the code for our app:
$ ionic start todo blank
That will create a folder called todo in the directory the command was run. Next, we will go into that directory and list the contents. Here is what the outer structure of your Ionic project will look like:
$ cd todo && ls

├── bower.json     // bower dependencies
├── config.xml     // cordova configuration
├── gulpfile.js    // gulp tasks
├── hooks          // custom cordova hooks to execute on specific commands
├── ionic.project  // ionic configuration
├── package.json   // node dependencies
├── platforms      // iOS/Android specific builds will reside here
├── plugins        // where your cordova/ionic plugins will be installed
├── scss           // scss code, which will output to www/css/
└── www            // application - JS code and libs, CSS, images, etc.
If you are planning on using any version control system, you can go ahead and set it up in this new folder.
Configure Platforms
Now, we need to tell ionic that we want to enable the iOS and Android platforms. Note: unless you are on MacOS, leave out the iOS platform:
$ ionic platform ios
$ ionic platform android
If you see errors here, make sure to follow the platform guides above to install necessary platform tools.
Test it out
Just to make sure the default project worked, try building and running the project (substitute ios for android to build for Android instead):
$ ionic build ios
$ ionic emulate ios
Starting the app
Now that we've got everything installed and a new Cordova project created, let's jump in and start building a real app!
Since every Cordova app is basically a web page, we need to have an index.html file in our app which defines the first page that loads in the app. You will find the index.html in the root folder of the Appster template. This file has a common structure:
<!DOCTYPE html>
<html>
  <head>
    <meta charset="utf-8">
    <title>Todo</title>
    <meta name="viewport" content="initial-scale=1, maximum-scale=1, user-scalable=no, width=device-width">

    <link href="lib/ionic/css/ionic.css" rel="stylesheet">

    <script src="lib/ionic/js/ionic.bundle.js"></script>

    <!-- Needed for Cordova/PhoneGap (will be a 404 during development) -->
    <script src="cordova.js"></script>
  </head>
  <body>
  </body>
</html>
In the shell above, we are including the Ionic CSS and both the core Ionic JS and the Ionic AngularJS extensions in the ionic.bundle.js file. Ionic comes with ngAnimate and ngSanitize bundled in, but to use other Angular modules you'll need to include them from thelib/js/angular directory.
Also note that the cordova.js or phonegap.js file must be the last script, and that this file will not be found in your development files, but rather automatically included when running or emulating your app.
Initializing the app
The main js file is located in the /js/app.js file. This file contains the AngularJS modules and tell Angular to initialize:
angular.module('todo', ['ionic'])
This is the Angular way of creating an application, and we are telling angular to include the ionic module which includes all of the Ionic code which will process the tags above and make our app come to life. Put your custom AngularJS scripts in this file.
Testing the app
Now, since we actually have something to look at, we need to talk about the testing and development process for our app. There are four ways to test your app as you develop: in a desktop WebKit browser, in the iOS or Android simulator, in a mobile browser on your phone, or as a native app on the phone.
Desktop browser testing
Testing your app in a browser is as simple as running the serve command in your project's root folder.
$ ionic serve
This will start a live-reload server for your project. When changes are made to any HTML, CSS, or JavaScript files, the browser will automatically reload when the files are saved.
Simulator testing
You can also test right in the simulator using the cordova commands. For example, to test in the iOS simulator, run:
$ ionic build ios
$ ionic emulate ios
Substitute ios with android for Android testing. If you want to get advanced, you can also open up the project file for a specific platform by opening the required XCode or Android Eclipse project in platforms/PLATFORM inside the root of your project. Then, you can build and test from inside the platform-specific IDE. Note: if you go this route, we recommend still working inside of the root www folder, and when you've made changes to this folder, run the command:
$ cordova prepare ios
Which will update the ios specific project with the code from the www folder. Note: this will overwrite any changes you've made to theplatforms/ios/www and other platform-specific folders.
Mobile browser testing
You can also test the app directly in a mobile browser. For OS X users, Safari on OS X can directly debug websites and simulator applications. First you have to enable the remote web inspector on both the device and Safari on desktop. To do this with iOS 7 and OS X Mavericks, enable the Web Inspector option in the iOS Settings -> Safari -> Advanced section, and also enable the Developer Menu in the Advanced section of the Safari OS X settings.
Android apps supporting Android 4.4 or above can also use Chrome for remote debugging. Check out the Android docs for more info.
If you are using the local server method from the Desktop testing section and you are on the same network as the desktop computer, you can connect to the ip address of the desktop computer to test. So, if our desktop is running a test server at 192.168.1.123:8000, we can just load that address into our mobile Chrome or Safari to test it.
One problem with testing in a mobile browser is that it's probably the furthest of the three options from the actual app experience. This is largely because the browser app is meant for browsing websites, so it often adds functionality that conflicts with your app. For example, Chrome and Safari both listen for drag events on the sides of the app which let you switch between open tabs. They also have issues with the URL bars getting in the way, and some scrolling behavior is not the same as it is in the web view running in Cordova. It is fine for small tests, but not recommended for more complex apps.
Testing as a native app
Since we are building a native (or "hybrid") app, we can (and should!) test it as one. There are serveral ways to do this. If you are building for iOS, you'll need to sign up for an Apple Developer account to test as a native app on an iPhone or iPad. Unfortunately, this costs $99 per year (don't blame us!). Once you have an account and you have set up XCode with your certificates to enable device testing, you'll want to open the XCode project from platforms/ios/ and do your testing from XCode.
Testing on Android is much easier and faster. To test on the device, simply plug it in, and run
$ ionic run android
If this doesn't work, make sure you have USB debugging enabled on your device, as described on the Android developer site.
CSS Components/AngularJS Extensions
Controlr is based on Ionic Framework. It is both a CSS framework and a Javascript UI library. Many components need Javascript in order to produce magic, though often components can easily be used without coding through framework extensions such as our AngularIonic extensions.
Ionic follows the View Controller pattern popularized in such frameworks as Cocoa Touch. In the View Controller pattern, we treat different sections of the interface as child Views or even child View Controllers that contain other views. View Controllers then "power" the Views inside of them to provide interaction and UI functionality. A great example is the Tab Bar View Controller which processes taps on a Tab Bar to switch between a set of viewable panes.
Explore the API docs for detailed information on the View Controllers and Javascript utilities available in Ionic.
CSS Components
Here are list of available CSS components:
- Header
- Content
- Footer
- Buttons
- List
- Cards
- Forms
- Toggle
- Checkbox
- Radio Buttons
- Range
- Select
- Tabs
- Grid
- Utility
AngularJS Extensions
Here are list of available javascript API:
Publishing the app
Firstly, we need to generate a release build of our app, targeted at each platform we wish to deploy on. Before we deploy, we should take care to adjust plugins needed during development that should not be in production mode. For example, we probably don't want the debug console plugin enabled, so we should remove it before generating the release builds:
$ cordova plugin rm org.apache.cordova.console
Android Publishing
To generate a release build for Android, we first need to make a small change to the AndroidManifest.xml file found in platforms/android. Edit the file and change the line:
<application android:debuggable="true" android:hardwareAccelerated="true" android:icon="@drawable/icon" android:label="@string/app_name">
and change android:debuggable to "false":
<application android:debuggable="false" android:hardwareAccelerated="true" android:icon="@drawable/icon" android:label="@string/app_name">
Now we can tell cordova to generate our release build:
$ cordova build --release android
Then, we can find our unsigned APK file in platforms/android/bin. In our example, the file wasplatforms/android/bin/HelloWorld-release-unsigned.apk. Now, we need to sign the unsigned APK and run an alignment utility on it to optimize it and prepare it for the app store. If you already have a signing key, skip these steps and use that one instead.
Let's generate our private key using the keytool command that comes with the JDK. If this tool isn't found, refer to the installation guide:
$ keytool -genkey -v -keystore my-release-key.keystore -alias alias_name -keyalg RSA -keysize 2048 -validity 10000
You'll first be prompted to create a password for the keystore. Then, answer the rest of the nice tools's questions and when it's all done, you should have a file called my-release-key.keystore created in the current directory.
Note: Make sure to save this file somewhere safe, if you lose it you won't be able to submit updates to your app!
To sign the unsigned APK, run the jarsigner tool which is also included in the JDK:
$ jarsigner -verbose -sigalg SHA1withRSA -digestalg SHA1 -keystore my-release-key.keystore HelloWorld-release-unsigned.apk alias_name
This signs the apk in place. Finally, we need to run the zip align tool to optimize the APK:
$ zipalign -v 4 HelloWorld-release-unsigned.apk HelloWorld.apk
Now we have our final release binary called HelloWorld.apk and we can release this on the Google Play Store for all the world to enjoy!
(There are a few other ways to sign APKs. Refer to the official Android App Signing documentation for more information.)
Google Play Store
Now that we have our release APK ready for the Google Play Store, we can create a Play Store listing and upload our APK.
To start, you'll need to visit the Google Play Store Developer Console and create a new developer account. Unfortunately, this is not free. However, the cost is only $25 compared to Apple's $99.
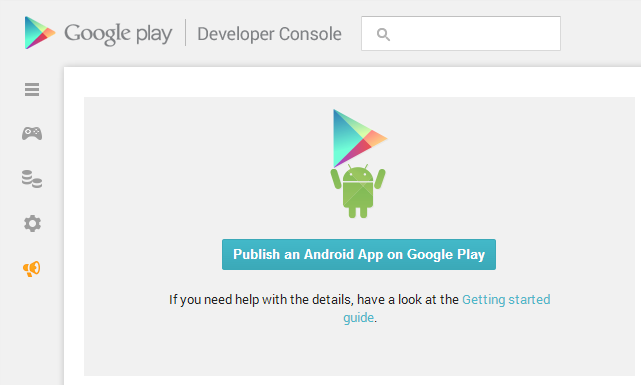
Once you have a developer account, you can go ahead and click "Publish an Android App on Google Play" as in the screenshot below:
Then, you can go ahead and click the button to edit the store listing (We will upload an APK later). You'll want to fill out the description for the app.
Updating your App
As you develop your app, you'll want to update it periodically.
In order for the Google Play Store to accept updated APKs, you'll need to edit the platforms/android/AndroidManifest.xml file to increment theandroid:versionCode value.
Localhost development
Opening the index.html file directly from a folder on your computer most likely will cause a XMLHttpRequest error. Most of modern browsers are blocking cross-origin requests and the template HTML files can not be loaded.
Changelog
Version 1.0
- initial release